

Portland Head Light Photography Guide: Best Views & Tips

Aerial view of Portland Head Light in Portland, Maine. ©2020 Chris Sidoruk
Quick Jump
- About Portland Head Light (History & Location)
- Best Photography Viewpoints at Portland Head Light
- Best Times and Conditions to Photograph Portland Head Light
- Portland Head Light Camera Settings
- Composition Techniques for Portland Head Light Photography
- Best Camera Gear for Portland Head Light Photography
- Planning Your Visit
- Final Thoughts
- Frequently Asked Questions
About Portland Head Light (History & Location)
Portland Head Light is one of the most recognizable and rewarding lighthouse photography locations in Maine. Located within Fort Williams Park in Cape Elizabeth, the historic lighthouse combines a classic New England structure with rocky coastline, open Atlantic views, changing weather, and a wide range of compositions within a relatively compact area.
For photographers, the appeal is not limited to the lighthouse itself. The surrounding landscape creates opportunities for wide coastal scenes, environmental lighthouse images, foreground-focused compositions, long exposures, and more intimate details. Depending on the weather and time of day, the same viewpoint can produce a completely different image.
I photographed Portland Head Light during an overcast coastal visit in 2020 using a Nikon D7000 and DJI Mavic Air. The changing light and rugged shoreline made it clear why this location remains one of Maine’s most photographed landmarks. Even without dramatic sunrise color, the soft conditions worked well with the white lighthouse, dark rocks, and muted Atlantic water.
This guide focuses on the photography side of visiting Portland Head Light, including the best viewpoints, lighting conditions, composition ideas, camera gear, recommended settings, and practical planning tips.
Portland Head Light Photography at a Glance
| Photography Detail | What to Expect |
|---|---|
| Location | Fort Williams Park, Cape Elizabeth, Maine |
| Best subjects | Lighthouse, rocky coastline, Atlantic views, coastal details |
| Best time of day | Sunrise, late afternoon, sunset, and blue hour |
| Best conditions | Soft overcast light, fog, dramatic clouds, or calm coastal weather |
| Best lenses | Wide-angle zoom, standard zoom, and short-to-medium telephoto |
| Tripod needed? | Highly recommended for long exposures, blue hour, and low light |
| Best photography styles | Coastal landscapes, lighthouse photography, long exposures, environmental compositions |
| Difficulty | Beginner-friendly, with more advanced opportunities along the rocky shoreline |
| Best season | Year-round; conditions and atmosphere change significantly by season |
Location
Fort Williams Park, Cape Elizabeth, Maine
Best Subjects
Lighthouse, rocky coastline, Atlantic views, coastal details
Best Time of Day
Sunrise, late afternoon, sunset, and blue hour
Best Conditions
Soft overcast light, fog, dramatic clouds, or calm coastal weather
Best Lenses
Wide-angle zoom, standard zoom, and short-to-medium telephoto
Tripod Needed?
Highly recommended for long exposures, blue hour, and low light
Best Photography Styles
Coastal landscapes, lighthouse photography, long exposures, environmental compositions
Difficulty
Beginner-friendly, with more advanced opportunities along the rocky shoreline
Best Season
Year-round; conditions and atmosphere change significantly by season
Why Portland Head Light Is One of Maine’s Best Photography Locations
Portland Head Light offers something many lighthouse locations do not: a strong subject surrounded by enough visual variety to support an entire photography session.
The lighthouse can be photographed as:
A classic architectural subject
Part of a wide coastal landscape
A focal point surrounded by rocky shoreline
A distant element within a larger environmental composition
A silhouette or secondary subject during changing light
A detail-oriented study of maritime architecture
The surrounding coastline also gives photographers room to move beyond the most recognizable postcard view. By changing position, focal length, foreground, or camera height, it is possible to create images that feel distinct while still clearly showing the location.
The strongest photographs usually combine the lighthouse with at least one additional visual element, such as:
Foreground rocks
Ocean movement
Coastal vegetation
Dramatic clouds
Leading shoreline lines
Atmospheric fog
Changing seasonal conditions
The goal is not simply to photograph the lighthouse. It is to show how the lighthouse relates to the surrounding Maine coast.
What Makes Portland Head Light Different From Other Lighthouse Locations?
Many lighthouse photography locations offer one dominant viewpoint. Portland Head Light provides several photographic environments within Fort Williams Park.
You can move between:
Open views of the lighthouse and coastline
Rocky shoreline compositions
Elevated perspectives
Wider environmental scenes
Historic structures and park details
Ocean-facing viewpoints with changing foregrounds
This variety makes the location useful for photographers with different goals.
A wide-angle photographer may focus on the relationship between the lighthouse, rocks, and Atlantic Ocean. A telephoto photographer may simplify the scene and isolate the lighthouse against the water or sky. A long-exposure photographer may use moving water and clouds to create a more atmospheric image.
The location also works well when conditions are not traditionally “perfect.”
Overcast skies can soften contrast and preserve detail in the white lighthouse. Fog can create depth and atmosphere. Storm clouds can add visual weight to a coastal composition. Even flat light can work when the composition emphasizes shape, texture, and the relationship between the lighthouse and shoreline.
Best Photography Opportunities at Portland Head Light
| Photography Opportunity | Best Approach | Recommended Lens |
|---|---|---|
| Classic lighthouse view | Use a balanced composition that includes the lighthouse and surrounding coastline | 24–70mm equivalent |
| Wide coastal landscape | Include foreground rocks, ocean, and sky to create depth | 14–24mm or 16–35mm equivalent |
| Lighthouse detail | Isolate architectural features and reduce visual distractions | 70–200mm equivalent |
| Long-exposure seascape | Use a tripod and neutral-density filter to smooth moving water | 16–35mm equivalent |
| Environmental composition | Place the lighthouse within a larger coastal scene | 24–70mm equivalent |
| Weather-focused image | Use clouds, fog, or ocean conditions as part of the story | 16–70mm equivalent |
| Aerial perspective | Show the relationship between the lighthouse, cliffs, park, and coastline | Drone, where permitted and operated legally |
Classic Lighthouse View
Best Approach: Use a balanced composition that includes the lighthouse and surrounding coastline
Recommended Lens: 24–70mm equivalent
Wide Coastal Landscape
Best Approach: Include foreground rocks, ocean, and sky to create depth
Recommended Lens: 14–24mm or 16–35mm equivalent
Lighthouse Detail
Best Approach: Isolate architectural features and reduce visual distractions
Recommended Lens: 70–200mm equivalent
Long-Exposure Seascape
Best Approach: Use a tripod and neutral-density filter to smooth moving water
Recommended Lens: 16–35mm equivalent
Environmental Composition
Best Approach: Place the lighthouse within a larger coastal scene
Recommended Lens: 24–70mm equivalent
Weather-Focused Image
Best Approach: Use clouds, fog, or ocean conditions as part of the story
Recommended Lens: 16–70mm equivalent
Aerial Perspective
Best Approach: Show the relationship between the lighthouse, cliffs, park, and coastline
Recommended Lens: Drone, where permitted and operated legally
A Location That Rewards Changing Your Perspective
One of the easiest mistakes at Portland Head Light is taking the first clear photograph of the lighthouse and moving on.
The iconic view is worth capturing, but the location becomes more interesting when you spend time exploring the relationship between the lighthouse and its surroundings.
After photographing the obvious composition, try changing one variable at a time:
Move closer or farther away
Lower the camera toward the foreground
Change from a wide-angle lens to a telephoto lens
Include more ocean
Reduce the amount of sky
Use rocks to create depth
Look for natural leading lines
Photograph the lighthouse from a less familiar angle
Small changes in position can create major differences in the final image.
A wide-angle composition may emphasize the scale of the coastline, while a longer focal length can compress the scene and make the lighthouse appear more connected to the ocean or distant background.
Portland Head Light Is More Than a Sunrise Location
Sunrise and golden-hour conditions can produce beautiful photographs, but they are not the only times worth visiting.
Portland Head Light can work well during:
Overcast Conditions
Cloud cover creates soft, even light that can help preserve detail in the white lighthouse and reduce harsh shadows.
Overcast weather is especially useful for:
Balanced lighthouse exposures
Detailed architectural images
Moody coastal compositions
Long exposures
Fog
Fog can simplify the background and create a strong sense of atmosphere.
When visibility changes, look for:
The lighthouse emerging from mist
Fading coastal layers
Simplified ocean backgrounds
Subtle tonal separation
Dramatic Weather
Storm clouds and rough ocean conditions can add energy to the scene.
In these conditions, the weather becomes part of the photograph rather than something to avoid.
Blue Hour
The period before sunrise or after sunset can create cooler tones and a calmer atmosphere. A tripod becomes especially useful as exposure times increase.
Clear Midday Conditions
Midday light is often more challenging, but it can still work for:
Architectural details
Tight compositions
Coastal textures
Documentary images of the location
If the light is harsh, avoid forcing a wide landscape image. Instead, simplify the frame and look for details that are less dependent on soft light.
A Photography Location for Multiple Skill Levels
Portland Head Light is approachable for beginners while still offering enough variety for experienced landscape photographers.
Beginners Can Focus On:
A clear lighthouse composition
Straight horizons
Basic foreground placement
Balanced exposure
Using a standard zoom lens
Intermediate Photographers Can Explore:
Foreground layering
Long exposures
Weather-based storytelling
Wide-angle coastal compositions
More intentional use of focal length
Advanced Photographers Can Experiment With:
Complex shoreline compositions
Atmospheric weather
Advanced exposure blending
Intentional motion in water and clouds
Less familiar perspectives
Detailed visual storytelling across the larger park
The location does not require advanced equipment to produce strong images. A camera, versatile lens, and careful composition are enough to begin. More specialized equipment can expand the creative options, but the most important decisions are still based on light, perspective, timing, and composition.
Portland Head Light Photography: Quick Answer
If you are visiting Portland Head Light primarily to take photographs, arrive early enough to explore the location before committing to one viewpoint.
Start with a classic lighthouse composition, then work outward:
Photograph the lighthouse from the main viewing area.
Look for foreground rocks or shoreline elements.
Create a wider environmental image.
Switch to a longer focal length for a simplified composition.
Return to your strongest viewpoint if the light or weather improves.
Bring a versatile zoom lens, extra batteries, weather protection, and a tripod if you plan to photograph during low light or create long exposures.
The best images often come from adapting to the conditions rather than waiting for a specific type of sky.
Best Portland Head Light Photography Viewpoints
Portland Head Light offers more than one recognizable photograph. The lighthouse, rocky shoreline, open Atlantic views, and surrounding landscape create several distinct composition opportunities within Fort Williams Park.
The best approach is to avoid treating the first viewpoint as the entire location.
Start with the classic lighthouse view, then explore how the scene changes as you move around the park. A small change in camera position can alter the relationship between the lighthouse, ocean, rocks, and sky.
When photographing Portland Head Light, think in terms of viewpoint + focal length + conditions.
The same viewpoint can produce a very different image depending on whether you use a wide-angle lens, standard zoom, or telephoto lens. Weather also changes the visual character of the scene. Soft clouds may create a calm coastal image, while fog or dramatic weather can turn the lighthouse into a more atmospheric subject.
Portland Head Light Viewpoint Comparison
| Viewpoint or Composition | Best For | Recommended Lens | Photography Tip |
|---|---|---|---|
| Classic lighthouse view | First-time visitors and recognizable images | 24–70mm equivalent | Keep the lighthouse prominent while including enough coastline for context |
| Wide coastal viewpoint | Landscape photography and environmental storytelling | 14–24mm or 16–35mm equivalent | Use rocks or shoreline features to create foreground depth |
| Rocky shoreline composition | More dramatic and original images | 16–35mm equivalent | Get low and use foreground rocks to lead toward the lighthouse |
| Telephoto lighthouse view | Simplified compositions and architectural emphasis | 70–200mm equivalent | Use compression to reduce distractions and isolate the subject |
| Ocean-focused composition | Long exposures and weather storytelling | 16–35mm or 24–70mm equivalent | Let moving water become part of the visual design |
| Environmental park view | Showing the lighthouse within its setting | 24–70mm equivalent | Include coastal terrain without making the frame feel crowded |
| Detail composition | Architectural and editorial images | 70–200mm equivalent | Focus on the tower, lantern room, or distinctive structural elements |
Classic Lighthouse View
Best For: First-time visitors and recognizable images
Recommended Lens: 24–70mm equivalent
Photography Tip: Keep the lighthouse prominent while including enough coastline for context
Wide Coastal Viewpoint
Best For: Landscape photography and environmental storytelling
Recommended Lens: 14–24mm or 16–35mm equivalent
Photography Tip: Use rocks or shoreline features to create foreground depth
Rocky Shoreline Composition
Best For: More dramatic and original images
Recommended Lens: 16–35mm equivalent
Photography Tip: Get low and use foreground rocks to lead toward the lighthouse
Telephoto Lighthouse View
Best For: Simplified compositions and architectural emphasis
Recommended Lens: 70–200mm equivalent
Photography Tip: Use compression to reduce distractions and isolate the subject
Ocean-Focused Composition
Best For: Long exposures and weather storytelling
Recommended Lens: 16–35mm or 24–70mm equivalent
Photography Tip: Let moving water become part of the visual design
Environmental Park View
Best For: Showing the lighthouse within its setting
Recommended Lens: 24–70mm equivalent
Photography Tip: Include coastal terrain without making the frame feel crowded
Detail Composition
Best For: Architectural and editorial images
Recommended Lens: 70–200mm equivalent
Photography Tip: Focus on the tower, lantern room, or distinctive structural elements
1. The Classic Portland Head Light View
The classic view is the best place to begin, especially if this is your first visit.
This perspective clearly shows:
The lighthouse tower
The keeper’s house
The coastal setting
The Atlantic Ocean
The relationship between the historic structure and the surrounding landscape
A standard zoom lens is often the most useful choice here. A 24–70mm equivalent gives you enough flexibility to photograph a balanced scene without introducing the strong perspective exaggeration of an ultra-wide lens.
Start by placing the lighthouse slightly away from the center of the frame. Then evaluate the surrounding space.
Ask:
Does the coastline add depth?
Is there too much empty sky?
Are distracting structures entering the edges?
Does the lighthouse have enough visual separation from the background?
Is the horizon level?
The classic composition is recognizable because it clearly communicates the location. That does not make it unoriginal. It simply means you should focus on making the image clean, balanced, and responsive to the conditions.
Composition Tip
Do not automatically place the lighthouse in the exact center.
Try several versions:
Lighthouse centered for symmetry
Lighthouse on the left with open ocean on the right
Lighthouse on the right with coastline leading into the frame
A wider composition that emphasizes the surrounding landscape
Review the images at full size before moving on. Small differences in framing can make one version feel much more balanced than another.
2. Use the Rocky Shoreline as a Foreground
The rocky coastline is one of the strongest tools available for creating depth.
Instead of photographing the lighthouse against a simple ocean background, look for foreground rocks that can connect the viewer to the scene.
A strong layered composition may include:
Foreground rocks
Midground shoreline or ocean
Portland Head Light
Background sky
This creates a visual path through the image.
A wide-angle lens is especially useful because it can make nearby foreground elements appear larger while keeping the lighthouse and coastline visible in the distance.
However, wide-angle lenses require careful positioning.
If the foreground is too empty, the image may feel stretched and disconnected. If the camera is too high, the rocks may lose their visual importance.
Try lowering the camera closer to the ground. This can make the foreground feel more substantial and create stronger leading lines toward the lighthouse.
What to Look For
Search for:
Cracks or lines in the rocks
Curving shoreline edges
Repeating rock shapes
Small pools or wet surfaces
Natural paths that point toward the lighthouse
Avoid adding foreground only because the scene “needs depth.” The foreground should contribute to the composition and guide attention toward the main subject.
3. Create a Wide Coastal Landscape
Portland Head Light works well as part of a larger landscape.
Instead of making the lighthouse fill most of the frame, step back and show more of the Atlantic coastline.
A wide composition can communicate:
The exposed coastal environment
The scale of the park
The relationship between land and ocean
The lighthouse’s position along the shoreline
Changing weather across the horizon
A 16–35mm equivalent lens is often useful for this approach.
Wide compositions work especially well when the sky is visually interesting. Clouds, fog, color, or atmospheric conditions can add another layer to the image.
If the sky is plain and featureless, reduce the amount of sky rather than automatically including half the frame.
The best sky-to-land balance depends on the conditions.
Use more sky when:
Clouds create strong patterns
Sunrise or sunset color is developing
Weather is part of the story
The sky adds visual direction
Use less sky when:
The sky is empty
The coastline contains more detail
The lighthouse is the primary subject
Foreground rocks provide stronger visual interest
4. Use a Telephoto Lens to Simplify the Scene
A telephoto lens can create photographs that feel very different from the familiar wide coastal view.
Longer focal lengths allow you to:
Isolate the lighthouse
Reduce distracting surroundings
Compress the relationship between the lighthouse and background
Emphasize architectural details
Create a cleaner, more graphic composition
A 70–200mm equivalent lens is useful for this type of photography.
Instead of trying to include the entire lighthouse and coastline, look for smaller visual relationships.
You might isolate:
The lighthouse tower against the sky
The lantern room and upper structure
The lighthouse framed by coastal terrain
A section of the building with ocean behind it
Telephoto compositions can be especially useful during flat or busy conditions because they allow you to remove visual distractions.
Telephoto Composition Tip
Long lenses narrow the field of view, but they also make camera movement more noticeable.
Use:
A tripod when practical
Faster shutter speeds when handholding
Image stabilization if available
Careful focus on the lighthouse
For still scenes, there is no reason to rush. Take time to refine the frame and check the edges before making the final exposure.
5. Photograph the Lighthouse as Part of the Environment
A strong environmental photograph does not treat Portland Head Light as an isolated object.
Instead, it shows how the lighthouse exists within:
The coastline
The ocean
The weather
Fort Williams Park
The larger Maine landscape
Environmental compositions often work best when the lighthouse occupies less of the frame.
The lighthouse may be relatively small, but it should still have a clear purpose within the image.
For example:
The lighthouse can provide scale against a large ocean view.
It can act as a visual anchor beneath dramatic clouds.
It can create a focal point within a wider coastal landscape.
It can balance a large foreground element.
This approach is useful when the surrounding conditions are visually stronger than the lighthouse itself.
During dramatic weather, the sky and ocean may become equal parts of the story.
6. Use Ocean Movement for Long-Exposure Images
The Atlantic Ocean can add motion and atmosphere to Portland Head Light photographs.
A long exposure can transform moving water into:
Smooth, mist-like surfaces
Soft streaks
Flowing patterns around rocks
A calmer visual contrast against the stationary lighthouse
A tripod is essential.
Your shutter speed will depend on the amount of movement and the effect you want.
As a general starting point:
| Desired Effect | Starting Shutter Speed |
|---|---|
| Slight water motion | 1/4 to 1 second |
| Visible flowing texture | 1–5 seconds |
| Smooth water | 5–15 seconds |
| Strongly softened water | 15–30 seconds or longer |
Slight Water Motion
Starting Shutter Speed: 1/4 to 1 second
Visible Flowing Texture
Starting Shutter Speed: 1–5 seconds
Smooth Water
Starting Shutter Speed: 5–15 seconds
Strongly Softened Water
Starting Shutter Speed: 15–30 seconds or longer
These are starting points, not fixed rules.
Ocean movement changes constantly. Take several exposures and compare the results.
A neutral-density filter may be useful when shooting long exposures during brighter conditions.
Long-Exposure Composition Tip
Do not let the long exposure become the entire photograph.
The lighthouse should still have a clear relationship with:
The foreground
The ocean
The horizon
The surrounding coastline
Motion should support the composition rather than distract from it.

Portland Head Light in Portland, Maine. ©2020 Chris Sidoruk
7. Look for Less Obvious Lighthouse Compositions
After capturing the classic view, challenge yourself to photograph details that are not immediately obvious.
Look for:
Framing created by nearby vegetation
Shoreline curves
Architectural textures
Historic structures within the park
Reflections or wet surfaces
Repeating shapes
Small sections of the lighthouse
These images can add variety to a larger photo set.
If you are creating a travel gallery, blog article, or portfolio series, a mix of wide, medium, and tight photographs creates a stronger visual story than multiple versions of the same viewpoint.
A useful sequence may include:
Wide establishing image
Classic lighthouse composition
Rocky shoreline image
Telephoto lighthouse photograph
Architectural detail
Weather or ocean-focused image
This creates visual variety while documenting the location more completely.
8. Use Weather as a Composition Tool
Weather can change the strongest viewpoint.
A clear sky may favor a clean architectural composition. Fog may encourage simpler, more atmospheric framing. Dramatic clouds may justify a wider composition with more sky.
Instead of arriving with one image already planned, adjust to what the conditions provide.
Clear Conditions
Focus on:
Clean lighthouse detail
Blue ocean color
Strong architectural contrast
Simple compositions
Overcast Conditions
Focus on:
Soft tonal transitions
Coastal textures
Balanced exposure
Moody environmental images
Foggy Conditions
Focus on:
Simplification
Atmospheric depth
Fading backgrounds
The lighthouse emerging from mist
Dramatic Weather
Focus on:
Cloud structure
Ocean movement
Visual tension
The lighthouse as a stable focal point
The weather does not need to be “beautiful” in a traditional sense. It needs to contribute to the image.
9. Check the Edges Before Taking the Photograph
Coastal photography often includes distractions that are easy to overlook while concentrating on the lighthouse.
Before taking the final image, check:
The horizon
The corners
The edges of the frame
Unwanted structures
Bright distractions
Cropped shoreline elements
Awkward overlaps
A strong composition can be weakened by a small object entering the edge of the frame.
Take an extra moment to inspect the entire viewfinder or screen.
If something is distracting, try:
Moving a few steps
Changing focal length
Adjusting camera height
Reframing slightly
Using a tighter composition
Small corrections are usually easier in the field than during editing.
10. Build a Complete Portland Head Light Photo Story
If you are visiting for more than a quick snapshot, photograph the location as a sequence rather than a single image.
A complete photo story could include:
Establishing Image
A wide view showing Portland Head Light within the Maine coastline.
Main Lighthouse Image
A clear, recognizable composition of the lighthouse and keeper’s house.
Foreground-Focused Image
A low-angle composition using rocks or shoreline texture.
Environmental Image
The lighthouse placed within a larger view of the ocean, park, or weather.
Detail Image
A tighter photograph of the tower, lantern room, or historic architecture.
Atmospheric Image
Fog, ocean movement, clouds, or changing light becoming part of the story.
This approach creates more variety and encourages you to explore beyond the first viewpoint.
Portland Head Light Composition Checklist
Before leaving a viewpoint, ask:
Is the lighthouse clearly separated from the background?
Is the horizon level?
Does the foreground add depth?
Are there distracting objects near the edges?
Is the amount of sky appropriate for the conditions?
Have I tried both wide and tighter focal lengths?
Does the composition show the location rather than only the structure?
Have I created at least one image that is different from the standard view?
The goal is not to avoid the iconic composition. It is to capture that image and then continue looking.
Portland Head Light has been photographed countless times, but changing weather, light, season, focal length, and perspective create new opportunities during every visit.
Best Times and Conditions for Photographing Portland Head Light
Portland Head Light can be photographed throughout the year and in almost any weather, but the conditions you choose will strongly influence the mood, color, and composition of the final image.
There is no single “best” time for every photographer.
A sunrise photographer may prioritize soft light and quieter conditions. A long-exposure photographer may prefer moving clouds and active water. Someone creating a clean architectural image may benefit from bright but controlled daylight. Fog can simplify the scene, while dramatic weather can add energy and atmosphere.
The most useful approach is to match the conditions to the type of photograph you want to create.
Portland Head Light Photography Conditions at a Glance
| Condition or Time | Best For | What to Expect |
|---|---|---|
| Sunrise | Soft coastal light, quieter conditions, atmospheric landscapes | Changing color, lower-angle light, and fewer visitors |
| Golden hour | Warm tones and dimensional light | Stronger contrast and warmer color |
| Sunset | Coastal landscapes and dramatic skies | Changing light, longer shadows, and potential color over the ocean |
| Blue hour | Calm, cool-toned images | Low light and longer exposures; a tripod is recommended |
| Overcast | Balanced lighthouse exposures and moody scenes | Soft light with reduced harsh contrast |
| Fog | Atmospheric and minimalist photography | Simplified backgrounds and changing visibility |
| Stormy weather | Dramatic coastal storytelling | Strong clouds, rough water, wind, and rapidly changing conditions |
| Midday | Architectural details and documentary images | Brighter light, stronger shadows, and more visitors |
| Winter | Minimalist scenes and seasonal atmosphere | Cold conditions, lower sun angles, and possible snow or ice |
Sunrise
Best For: Soft coastal light, quieter conditions, atmospheric landscapes
What to Expect: Changing color, lower-angle light, and fewer visitors
Golden Hour
Best For: Warm tones and dimensional light
What to Expect: Stronger contrast and warmer color
Sunset
Best For: Coastal landscapes and dramatic skies
What to Expect: Changing light, longer shadows, and potential color over the ocean
Blue Hour
Best For: Calm, cool-toned images
What to Expect: Low light and longer exposures; a tripod is recommended
Overcast
Best For: Balanced lighthouse exposures and moody scenes
What to Expect: Soft light with reduced harsh contrast
Fog
Best For: Atmospheric and minimalist photography
What to Expect: Simplified backgrounds and changing visibility
Stormy Weather
Best For: Dramatic coastal storytelling
What to Expect: Strong clouds, rough water, wind, and rapidly changing conditions
Midday
Best For: Architectural details and documentary images
What to Expect: Brighter light, stronger shadows, and more visitors
Winter
Best For: Minimalist scenes and seasonal atmosphere
What to Expect: Cold conditions, lower sun angles, and possible snow or ice
Sunrise Photography at Portland Head Light
Sunrise is often one of the most rewarding times to photograph Portland Head Light.
Early morning can provide:
Lower-angle light
Softer tonal transitions
Cooler or warmer color depending on conditions
Fewer visitors in the frame
More time to explore before the park becomes busy
A quieter atmosphere for working carefully
The strongest sunrise photographs do not always happen when the sun itself is visible.
Cloud cover can reflect color before sunrise, while broken clouds may create changing patterns across the sky. Even a mostly overcast morning can produce soft, balanced light that works well with the white lighthouse and dark coastal rocks.
Arrive early enough to photograph several stages of the morning:
Pre-dawn: Cool tones and low-light atmosphere
Civil twilight: Increasing detail and softer contrast
Sunrise: Rapid changes in color and brightness
Early morning: Directional light and more visible coastal detail
Do not pack up immediately after the sun appears. Light can continue changing for several minutes, and the best balance between the lighthouse, sky, and ocean may occur after the initial sunrise moment.
Sunrise Photography Tip
Start with a tripod-mounted wide or standard zoom lens.
Take a few test exposures before the brightest color appears so you are ready when the conditions change.
If the sky is much brighter than the foreground, consider:
Exposure bracketing
A graduated neutral-density filter
A slightly darker exposure to preserve sky detail
Blending exposures later when appropriate
Avoid relying on a single exposure if the scene contains more contrast than your camera can comfortably capture.
Sunset and Golden-Hour Photography
Late afternoon and sunset can create warmer color and more directional light.
Depending on the season and weather, golden-hour conditions may add:
Warm tones to the lighthouse and surrounding landscape
Longer shadows
More visible texture in the rocks
Increased separation between the lighthouse and background
Color in clouds or along the horizon
The quality of the light matters more than the exact time shown on a weather app.
A clear sky may produce clean, simple light but little color. Broken clouds can create stronger visual interest because they reflect and shape the changing light.
During golden hour, pay attention to how the light affects the lighthouse itself.
Ask:
Is one side becoming too bright?
Are shadows adding useful depth?
Does the light separate the lighthouse from the background?
Is the surrounding coastline becoming more visually interesting?
If the lighthouse is strongly backlit, expose carefully to avoid losing detail in the structure.
You may need to choose between:
Preserving the sky
Preserving detail in the lighthouse
Creating a silhouette
Bracketing multiple exposures
Each choice can create a different visual result.
Blue-Hour Photography
Blue hour occurs during the low-light period before sunrise and after sunset.
The sky often takes on cooler blue tones while the landscape becomes darker and more subdued.
Portland Head Light can look especially calm during blue hour because the cooler color palette complements the ocean and coastal setting.
Blue-hour photography is useful for:
Quiet, atmospheric lighthouse images
Long exposures
Smooth water
Cloud movement
Balanced sky tones
More minimalist compositions
A tripod is strongly recommended because shutter speeds may become several seconds long.
Start with:
ISO 100–400
Aperture around f/8–f/11
A shutter speed based on the available light and desired water movement
Review the histogram rather than relying only on how bright the image appears on the camera screen.
As the light decreases, exposure times may change quickly. Recheck your settings regularly.
Blue-Hour Tip
If the lighthouse or nearby structures are illuminated, expose carefully to preserve highlight detail.
Bright lights can become clipped long before the surrounding sky appears overexposed.
Overcast Conditions
Overcast weather is often underestimated by photographers.
At Portland Head Light, clouds can create soft, even light that makes it easier to retain detail in both the white lighthouse and darker coastal landscape.
Overcast conditions are useful for:
Balanced exposures
Architectural detail
Moody coastal images
Long-exposure photography
Soft color palettes
Reducing harsh shadows
The white lighthouse can become difficult to photograph in direct midday sunlight because bright areas may lose detail while darker rocks remain heavily shadowed.
Cloud cover reduces that contrast.
Instead of trying to create dramatic color when the sky is flat, focus on:
Shape
Texture
Tonal relationships
Foreground structure
The contrast between the lighthouse and coastline
A gray sky does not automatically make a weak photograph. If the scene feels quiet or moody, allow the image to reflect that atmosphere.
Overcast Composition Tip
Reduce empty sky when it does not add visual value.
If the cloud cover is uniform and featureless, place more emphasis on:
Foreground rocks
Shoreline patterns
The lighthouse
Ocean texture
A tighter composition may be stronger than a wide frame dominated by blank clouds.
Fog and Coastal Mist
Fog can create some of the most distinctive photographs at Portland Head Light.
It can:
Simplify the background
Reduce visual distractions
Create depth through fading layers
Add a sense of mystery
Make the lighthouse appear to emerge from the coastal landscape
Fog conditions can change quickly, so remain flexible.
The lighthouse may be fully visible one moment and partially obscured the next.
Rather than waiting for perfect visibility, photograph the transitions.
Look for:
The lighthouse appearing through thin mist
Coastline details fading into the background
Soft separation between ocean and sky
Layers of varying visibility
Fog often works best with simpler compositions.
A busy frame may become confusing when contrast is low. Use the lighthouse as a clear focal point and avoid including unnecessary elements.
Fog Photography Tip
Watch for moisture on the front of your lens.
Salt spray and mist can reduce contrast or create visible soft spots. Keep a clean microfiber cloth accessible and check the lens regularly.
Do not wipe the lens constantly unless needed. Repeated wiping can smear moisture across the glass. Use a clean, dry section of the cloth when possible.
Stormy and Dramatic Weather
Coastal storms can create powerful images, but they also introduce additional risks.
Strong weather may bring:
Fast-moving clouds
Rough ocean conditions
Larger waves
Strong wind
Rain or sea spray
Rapid changes in visibility
These conditions can make Portland Head Light feel more dramatic and emphasize its role as a historic coastal beacon.
Storm photography can work well when the lighthouse acts as a stable visual anchor against moving clouds and active water.
Try compositions that include:
More sky
Strong cloud structure
Ocean movement
Foreground rocks
The lighthouse positioned against the weather
A longer exposure may soften cloud movement or water, while a faster shutter speed can preserve the texture and energy of rough conditions.
Coastal Safety Matters
Do not move onto wet or exposed rocks simply to improve the composition.
Ocean conditions can change quickly, and waves may reach farther than expected.
Stay aware of:
Rising water
Slippery surfaces
Strong wind
Unstable footing
Incoming waves
Camera equipment exposed to salt spray
No photograph is worth entering an unsafe position.
If conditions are severe, photograph from a stable and permitted location rather than trying to get closer to the water.
Midday Photography
Midday is usually the least forgiving time for wide landscape photography, especially on clear days.
The light can produce:
Strong shadows
Bright highlights
Reduced color in the sky
High contrast between the lighthouse and surrounding terrain
More visitors in the area
That does not mean midday photography is impossible.
Adjust your approach.
Instead of forcing a large scenic composition, focus on:
Lighthouse details
Architectural textures
Tighter telephoto images
Coastal patterns
Documentary photographs of the location
A polarizing filter may help reduce glare from water and certain reflective surfaces, but use it carefully with wide-angle lenses. Uneven polarization can make parts of the sky appear darker than others.
Midday can also be useful when the weather is overcast because the cloud cover softens the light.
Best Seasons for Photographing Portland Head Light
Portland Head Light is a year-round photography location, but each season changes the landscape and shooting experience.
Spring
Spring can bring:
Cooler coastal conditions
Changing weather
Fresh vegetation
Fewer visitors than peak summer periods
Atmospheric clouds and fog
Spring weather can be unpredictable, so bring protection for both yourself and your equipment.
This season is useful for photographers who enjoy softer light and changing conditions.
Summer
Summer generally offers:
Longer daylight hours
More comfortable temperatures
Greater access for visitors
Green coastal landscapes
More predictable travel conditions
Summer is also the busiest season.
If you want cleaner compositions with fewer people, arrive early in the morning or photograph during quieter periods.
The longer days provide more flexibility, but bright midday light can still be challenging.
Fall
Fall can bring:
Cooler temperatures
Changing vegetation
Lower sun angles
More atmospheric weather
Stronger seasonal color away from the immediate coastline
The lighthouse and ocean remain the primary subjects, but autumn conditions can add variety to the surrounding park.
Fall may be especially appealing for photographers who prefer cooler light and less summer activity.
Winter
Winter can produce some of the most distinctive coastal images.
Possible conditions include:
Snow
Ice
Strong coastal wind
Dramatic clouds
Lower-angle sunlight
Minimalist color palettes
Winter also requires additional preparation.
Bring:
Extra batteries
Warm clothing
Gloves that allow camera operation
Weather protection
A stable tripod
Cold temperatures can reduce battery performance. Keep spare batteries warm and replace them as needed.
Be cautious around icy or wet surfaces.
Wind and Coastal Conditions
Wind affects more than personal comfort.
Strong wind can:
Shake a tripod
Move camera straps
Cause vibration during long exposures
Increase sea spray
Make lens changes more difficult
To improve stability:
Keep tripod legs relatively short when possible
Use a wider stance
Avoid extending the center column
Remove or secure loose camera straps
Add weight only if the tripod manufacturer recommends it and conditions allow
Do not hang a loose bag from the center column in strong wind. It may swing and create additional vibration.
If the camera is moving during a long exposure, increase stability before increasing ISO or changing other settings.
Tide and Ocean Conditions
The appearance of the shoreline can change depending on ocean conditions.
Water level and wave activity may affect:
Which rocks are visible
The amount of water around foreground elements
The shape of the shoreline
The strength of ocean movement
The safety of certain areas
If a specific foreground composition is important, check local tide and marine conditions before visiting.
Do not assume that a photograph taken at one tide level can be recreated at another.
The same viewpoint may look substantially different depending on water level, wave activity, and weather.
How to Choose the Best Conditions for Your Photography Goal
Before visiting, decide what type of image you want.
| Photography Goal | Conditions to Prioritize |
|---|---|
| Classic lighthouse photograph | Soft morning or late-afternoon light |
| Warm coastal landscape | Golden hour with broken clouds |
| Moody lighthouse image | Overcast weather, fog, or coastal mist |
| Long-exposure seascape | Stable tripod conditions with visible water movement |
| Dramatic weather image | Active clouds and changing coastal conditions |
| Minimalist composition | Fog, snow, or simple overcast conditions |
| Architectural detail | Bright but controlled light or soft overcast conditions |
| Quiet visitor experience | Early morning or less busy seasonal periods |
Classic Lighthouse Photograph
Conditions to Prioritize: Soft morning or late-afternoon light
Warm Coastal Landscape
Conditions to Prioritize: Golden hour with broken clouds
Moody Lighthouse Image
Conditions to Prioritize: Overcast weather, fog, or coastal mist
Long-Exposure Seascape
Conditions to Prioritize: Stable tripod conditions with visible water movement
Dramatic Weather Image
Conditions to Prioritize: Active clouds and changing coastal conditions
Minimalist Composition
Conditions to Prioritize: Fog, snow, or simple overcast conditions
Architectural Detail
Conditions to Prioritize: Bright but controlled light or soft overcast conditions
Quiet Visitor Experience
Conditions to Prioritize: Early morning or less busy seasonal periods
The forecast should guide your expectations, but it should not determine whether the trip is worthwhile.
Some of the strongest coastal photographs happen when the conditions are different from what you originally planned.
A Practical Portland Head Light Photography Timeline
For a sunrise-focused visit, use this general approach:
60–90 Minutes Before Sunrise
Arrive and orient yourself
Check the weather and ocean conditions
Identify the strongest viewpoints
Set up your tripod
Take test compositions
30–45 Minutes Before Sunrise
Photograph the pre-dawn sky
Check focus and exposure
Begin watching for color or cloud changes
Sunrise
Capture the main lighthouse composition
Watch for changing light on the coastline
Adjust exposure as brightness increases
15–30 Minutes After Sunrise
Revisit your strongest composition
Photograph details and alternative angles
Try wider and tighter focal lengths
After the Main Light
Explore the shoreline
Create environmental images
Photograph architectural details
Look for compositions that were not visible in low light
This structure gives you a plan without limiting your ability to respond to changing conditions.
Key Takeaway
The best time to photograph Portland Head Light depends on the image you want to create.
Sunrise may provide soft light and quieter conditions. Golden hour can add warmth and dimension. Overcast skies can produce balanced exposures. Fog can create atmosphere. Storms can add energy, while winter may simplify the landscape.
Rather than waiting for one “perfect” condition, learn to adapt your composition to the weather in front of you.
Portland Head Light is strong enough as a subject to work in many different conditions. The most successful photographs usually come from matching the lens, viewpoint, and composition to the light and atmosphere available during the visit.
Best Time to Photograph Portland Head Light
One of the reasons Portland Head Light remains one of the most photographed locations in New England is that it changes dramatically depending on weather, season, and light.
There is no single “best” time to visit.
The strongest images usually come from matching the conditions to the type of photograph you want to create.
Sunrise Photography at Portland Head Light
Sunrise is one of the best times to photograph Portland Head Light.
The biggest advantage is positioning.
Because the lighthouse faces east toward the Atlantic Ocean, early morning light can create beautiful side lighting across the cliffs, rocks, and surrounding coastline.
Why sunrise works well:
Fewer crowds compared to midday
Softer directional light
Cooler coastal atmosphere
Better chance of dramatic clouds
More peaceful shooting conditions
Sunrise is especially effective for:
Wide-angle coastal landscapes
Long exposures
Reflections after calm conditions
Moody fog images
During summer months, arriving before sunrise is often necessary because the best light happens before many visitors arrive.
Golden Hour Photography
Late afternoon and sunset can also produce excellent images.
Although the lighthouse itself does not face directly into the setting sun, golden hour creates warm side lighting across the landscape.
This works especially well when:
Clouds catch warm sunlight
The ocean reflects evening color
The cliffs create contrast against the lighthouse
The sky becomes the main subject
Golden hour is ideal for a more classic postcard-style Portland Head Light photograph.
Overcast and Stormy Conditions
Some of the most dramatic Portland Head Light photographs are captured during weather that many visitors would consider “bad.”
Cloudy, windy, or stormy conditions can transform the location.
Overcast skies create:
Softer contrast
More even exposure
Moody coastal atmosphere
Stronger textures in rocks and waves
Storm conditions are particularly powerful because:
Waves become more dramatic
Clouds add movement
The lighthouse feels more isolated
The coastline appears more rugged
Safety should always come first near the cliffs and ocean.
Never approach unstable areas for a photograph.
Fog Photography at Portland Head Light
Fog is one of the most desirable conditions for lighthouse photography.
A foggy day can completely change the mood of Portland Head Light.
Fog creates:
Natural depth separation
Simplified compositions
A sense of mystery
Stronger emphasis on the lighthouse itself
When photographing in fog:
Use longer focal lengths to compress layers
Look for partial lighthouse visibility
Avoid overly bright exposures that remove atmosphere
Focus on shape and contrast rather than detail
Foggy mornings are among the most unique conditions you can experience at Fort Williams Park.
Portland Head Light Camera Settings
There is no single perfect setting, but landscape photography at Portland Head Light typically benefits from stability, controlled exposure, and careful composition.
Recommended Landscape Settings
General Coastal Landscape
Camera Mode: Manual or Aperture Priority
Aperture: f/8–f/11
ISO: 100
Focus: Manual or single-point autofocus
File Format: RAW
White Balance: Auto or daylight (adjust later)
This setup provides:
Maximum image quality
Good depth of field
Sharpness across the scene
Flexible editing options
Long Exposure Settings
Long exposures are one of the most popular techniques at Portland Head Light.
They create:
Smooth ocean movement
Soft wave patterns
Dramatic cloud motion
Minimalist coastal compositions
Recommended starting point:
Aperture: f/8–f/11
ISO: 100
Shutter Speed: 5–30 seconds
Tripod: Required
Filter: ND filter recommended
A 10-stop ND filter can allow longer exposures during brighter daylight conditions.
Photographing Waves and Ocean Movement
The Atlantic coastline around Portland Head Light provides excellent opportunities for capturing motion.
For different effects:
Fast shutter speeds:
Use:
1/250 sec or faster
Creates:
Frozen wave detail
Ocean spray
Crashing wave action
Medium shutter speeds:
Use:
1/10–1 second
Creates:
Dynamic water movement
Visible wave texture
Long exposures:
Use:
5+ seconds
Creates:
Smooth water
Minimalist coastal scenes
The best choice depends on the mood you want to create.
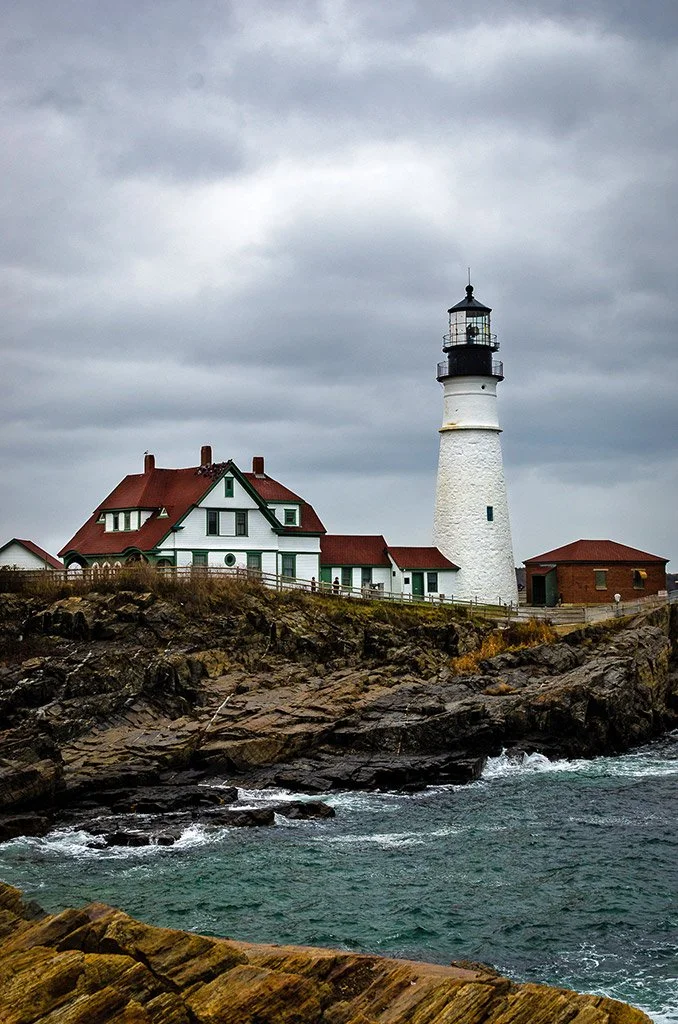
Portland Head Light in Portland, Maine on an overcast day. ©2020 Chris Sidoruk
Composition Techniques for Portland Head Light Photography
Because Portland Head Light is photographed thousands of times each year, composition is what separates a memorable image from a simple snapshot.
Use Foreground Elements for Depth
The rocky coastline around Fort Williams Park provides excellent foreground opportunities.
Look for:
Ocean rocks
Waves
Coastal vegetation
Cliff textures
A strong composition often includes:
Foreground:
rocks or water movement
Middle:
lighthouse structure
Background:
ocean and sky
This creates depth and guides the viewer through the image.
Include the Surrounding Landscape
A common mistake is photographing only the lighthouse.
The surrounding environment is what makes Portland Head Light unique.
The strongest images often include:
The rugged Maine coastline
Atlantic Ocean
Cliff edges
Natural rock formations
The lighthouse is part of the story, not the entire story.
Use Leading Lines
The coastline naturally creates directional lines that guide the viewer toward the lighthouse.
Look for:
Rock formations
Shoreline curves
Pathways
Ocean edges
Leading lines help create stronger visual flow.
Try Different Focal Lengths
Portland Head Light works well with multiple approaches.
Wide Angle (14–24mm)
Best for:
Large coastal scenes
Dramatic skies
Environmental storytelling
Standard Zoom (24–70mm)
Best for:
Balanced compositions
Travel photography
Flexible framing
Telephoto (70–200mm)
Best for:
Compressing lighthouse and coastline
Isolating details
Layering ocean and rocks
Many photographers only bring a wide-angle lens, but telephoto perspectives can create some of the most unique images.
Best Camera Gear for Portland Head Light Photography
Portland Head Light is a landscape photographer’s location, which means the best gear is not necessarily the most expensive gear. The ideal setup is one that gives you flexibility for changing coastal conditions, long exposures, and different compositions.
The biggest challenges when photographing Portland Head Light are:
rapidly changing weather
strong coastal winds
uneven lighting between sky and foreground
moving ocean water
crowded viewpoints
the need to quickly adjust compositions
A reliable, lightweight setup will usually outperform an oversized kit that slows you down.
Camera Body Recommendations
A modern mirrorless camera is ideal for photographing Portland Head Light because it provides:
excellent dynamic range for bright skies and dark rocks
strong low-light performance for sunrise and blue hour
electronic viewfinder exposure previews
lighter weight for coastal hikes and travel
Important camera features include:
High Dynamic Range
The scene around Portland Head Light often contains:
bright ocean reflections
colorful skies
dark foreground rocks
shadowed cliff areas
A camera with strong dynamic range allows you to recover more detail during editing.
Weather Sealing
Coastal environments can expose your equipment to:
salt spray
mist
wind-driven rain
changing temperatures
Weather-sealed camera bodies provide additional protection when shooting near the Atlantic coastline.
High-Resolution Sensors
Higher megapixel cameras can be beneficial for:
large landscape prints
cropping distant lighthouse details
capturing fine rock and architectural textures
However, composition and lighting matter more than resolution alone.
Recommended Camera Types
Full-Frame Mirrorless Cameras
Best for photographers who want maximum landscape image quality.
Advantages:
excellent low-light performance
stronger dynamic range
better detail retention
professional print capability
Popular options include:
Sony Alpha full-frame mirrorless cameras
Canon EOS R full-frame cameras
Nikon Z full-frame cameras
APS-C Mirrorless Cameras
A great option for photographers who want a lighter travel setup.
Advantages:
smaller and lighter bodies
more affordable
excellent image quality with modern sensors
APS-C cameras are more than capable of producing professional Portland Head Light images.
Best Lenses for Portland Head Light Photography
Lens choice has a major impact on how you tell the story of this location.
A wide-angle lens may be the obvious choice, but bringing multiple focal lengths allows you to create more unique images.
Wide-Angle Lens (14–24mm or 16–35mm)
A wide-angle lens is the classic choice for Portland Head Light.
Best for:
including the lighthouse and coastline together
dramatic skies
foreground rocks and ocean movement
environmental landscape images
This is usually the first lens most photographers reach for at this location.
Standard Zoom Lens (24–70mm)
A 24–70mm lens is arguably the most versatile option.
It allows you to:
create wider landscape compositions
isolate the lighthouse
adjust quickly when viewpoints become crowded
capture a variety of perspectives without changing lenses
For many photographers visiting Portland Head Light, this could be the only lens they need.
Telephoto Lens (70–200mm)
A telephoto lens is often overlooked but extremely useful.
It works well for:
compressing the lighthouse against the coastline
isolating architectural details
creating layered ocean compositions
photographing distant sections of the cliffs
Telephoto compression can produce images that look completely different from the traditional wide-angle viewpoint.
Essential Accessories for Portland Head Light Photography
Tripod
A sturdy tripod is one of the most important pieces of landscape photography equipment.
It allows you to:
shoot long exposures
use lower ISO settings
maximize image sharpness
photograph during sunrise and sunset
A tripod is especially valuable when creating smooth ocean movement with ND filters.
Look for:
strong stability in coastal wind
corrosion-resistant materials
easy setup on uneven rocks
Neutral Density (ND) Filters
ND filters are extremely useful for coastal photography.
They allow you to use slower shutter speeds during daylight.
Common uses:
3-Stop ND Filter
Useful for:
slightly smoothing ocean movement
controlling exposure during softer light
6-Stop ND Filter
Useful for:
longer daytime exposures
creating more dramatic water movement
10-Stop ND Filter
Useful for:
very long exposures
completely smoothing waves
creating minimalist coastal images
Circular Polarizer Filter
A polarizer is one of the most useful filters for Portland Head Light.
Benefits include:
reducing reflections on wet rocks
increasing contrast in clouds
deepening blue skies
enhancing ocean tones
It is especially helpful on sunny days when glare becomes a problem.
Extra Batteries and Memory Cards
Coastal sunrise and sunset sessions often last longer than expected.
Bring:
at least one spare battery
extra memory cards
portable charging options for longer trips
Cold temperatures and long exposures can reduce battery performance.
Weather Protection
Even calm days near Portland Head Light can become unpredictable.
Recommended items:
microfiber lens cloths
camera rain cover
waterproof camera bag
lens hood
protective filters
Salt spray can quickly affect image quality by creating spots on your front element.
Recommended Portland Head Light Photography Kit Examples
Minimal Travel Kit
Great for visitors who want quality without carrying a full setup.
Mirrorless camera body
24–70mm lens
Small tripod
Circular polarizer
Extra battery
This setup is flexible enough for most conditions.
Landscape Photography Kit
Ideal for photographers specifically visiting for coastal images.
Full-frame mirrorless camera
16–35mm wide-angle lens
24–70mm standard zoom
Sturdy tripod
ND filter set
Polarizer
This provides maximum creative flexibility.
Professional Landscape Kit
For photographers creating large prints or commercial work:
High-resolution full-frame camera
Wide-angle zoom
Telephoto zoom
Premium tripod system
Multiple filters
Weather protection
This setup allows complete control over every type of Portland Head Light composition.
Final Gear Advice
The best Portland Head Light photographs are not created by expensive equipment alone.
The most important factors are:
Being there in the right conditions
Understanding light and composition
Using a stable setup when needed
Having enough flexibility to adapt quickly
A simple camera, versatile lens, and tripod in excellent conditions will outperform an expensive setup used at the wrong time.
For most photographers visiting Portland Head Light, a weather-sealed camera, a 16–35mm or 24–70mm lens, tripod, and polarizer will provide everything needed to create professional-quality coastal landscape images.
Planning Your Visit to Portland Head Light (Parking, Access & What to Know)
Photographing Portland Head Light is about more than finding the famous viewpoint. A little preparation can make your visit much easier, especially during peak travel seasons when the park becomes crowded.
Located inside Fort Williams Park in Cape Elizabeth, Maine, Portland Head Light is easily accessible and offers multiple coastal viewpoints beyond the classic lighthouse composition.
Fort Williams Park Access
Portland Head Light sits within Fort Williams Park, a large coastal park with:
walking paths
ocean overlooks
historic structures
multiple photography locations
While many visitors stop only at the lighthouse overlook, exploring the surrounding park can reveal less common compositions.
Parking Information
Parking is available within Fort Williams Park, but availability varies depending on:
season
weekends
holidays
time of day
During summer and fall foliage season, arriving early is recommended.
Early arrival also gives photographers time to:
scout viewpoints
set up equipment
avoid crowded compositions
Walking and Accessibility
The main lighthouse viewing areas are relatively easy to access, with paved pathways and nearby parking.
Photographers carrying heavier equipment should still plan for:
uneven coastal terrain
walking between viewpoints
carrying a tripod and camera bag
Some of the most interesting compositions require moving beyond the main overlook.
What to Bring
A typical Portland Head Light photography kit should include:
camera body
wide-angle lens
tripod
extra batteries
memory cards
lens cloth for ocean spray
Coastal conditions can change quickly, so weather protection is always useful.
Nearby Photography Opportunities
Fort Williams Park offers additional subjects beyond Portland Head Light, including:
rocky coastline views
ocean cliffs
historic park structures
surrounding landscape scenes
Exploring the area can help create a more complete visual story rather than a single lighthouse photograph.
Real-World Shooting Tips for Portland Head Light
Arrive Earlier Than You Think
Portland Head Light is popular year-round.
Arriving early provides:
Better parking availability
More shooting locations
Fewer distractions
More peaceful conditions
This is especially important during:
Fall foliage season
Summer weekends
Sunrise shoots
Scout Before Setting Up
Walk the area before committing to one composition.
Look for:
Changing viewpoints
Foreground opportunities
Wave patterns
Light direction
Potential weather changes
The first viewpoint you see is rarely the strongest.
Protect Your Gear From Coastal Conditions
The Maine coastline can be harsh on equipment.
Bring:
Lens cloths
Weather protection
Extra batteries
Camera rain cover
Salt spray can quickly build up on lenses, especially during windy conditions.
Use a Tripod When Conditions Allow
A tripod is extremely useful for:
Sunrise photography
Long exposures
Low-light scenes
HDR landscapes
However, crowded viewpoints may require awareness of other visitors.
Be efficient and respectful when setting up.
Look Beyond the Classic View
The famous lighthouse angle is popular for a reason, but Portland Head Light offers many compositions.
Explore:
Different cliff viewpoints
Wider coastal scenes
Detail shots
Waves and rocks
Architectural details
The goal is not just to recreate an existing photograph.
The goal is to create your interpretation of one of Maine's most iconic landscapes.
Final Thoughts
Portland Head Light is more than just a famous lighthouse—it is one of the best examples of why coastal photography is about patience, timing, and adapting to conditions.
The most memorable images rarely come from simply arriving on a sunny afternoon and pressing the shutter.
They come from understanding:
how light interacts with the coastline
how weather changes the mood of the scene
how different compositions tell different stories
when to wait for the right moment
For photographers visiting Maine, Portland Head Light should be approached as a landscape rather than just a landmark.
Explore the cliffs. Watch the weather. Look for changing light. Try different perspectives.
The lighthouse has been photographed countless times, but the combination of your timing, composition, and creative choices can still produce something completely unique.
Frequently Asked Questions About Photographing Portland Head Light
What is the best time of day to photograph Portland Head Light?
The best time to photograph Portland Head Light depends on the type of image you want to create.
Sunrise is often the most rewarding because:
fewer crowds
softer directional light
calmer conditions
better chance of dramatic coastal atmosphere
Golden hour before sunset can create warm tones across the lighthouse and surrounding cliffs.
Overcast days should not be overlooked. Cloudy weather often produces some of the most dramatic lighthouse photographs because the softer light emphasizes:
cliff textures
ocean movement
architectural details
moody coastal atmosphere
For classic Portland Head Light photography, I would prioritize:
Sunrise with interesting clouds
Fog or coastal mist
Stormy weather with dramatic skies
Late afternoon golden hour
Where is the best place to photograph Portland Head Light?
The most popular viewpoints are located throughout Fort Williams Park, which provides several different compositions.
Some of the strongest photography locations include:
Classic Lighthouse Viewpoint
The iconic angle showing:
lighthouse tower
rocky coastline
Atlantic Ocean background
This is the composition most visitors recognize.
Cliffside Coastal Viewpoints
Moving along the shoreline provides opportunities for:
wider landscape compositions
foreground rocks
waves crashing against the coast
more dramatic perspectives
Aerial Photography Viewpoints
Drone photography can reveal the relationship between:
Portland Head Light
surrounding cliffs
Fort Williams Park
Maine's rugged coastline
Aerial images are especially effective during sunrise or when clouds create depth across the landscape.
What camera settings are best for Portland Head Light photography?
There is no single perfect setting, but these are strong starting points.
Landscape Photography Settings
Mode: Manual or Aperture Priority
Aperture: f/8–f/11
ISO: 100
Shutter speed: Adjust based on light
Focus: Manual or single-point autofocus
File format: RAW
Long Exposure Ocean Photography
For smoothing waves and creating motion:
Aperture: f/8–f/16
ISO: 100
Shutter speed: 1–30 seconds
Tripod required
ND filter recommended
The goal is not simply a sharp lighthouse—it is balancing the lighthouse, ocean movement, sky, and surrounding landscape.
Do I need a tripod to photograph Portland Head Light?
A tripod is highly recommended, especially if you want:
long exposure ocean shots
sunrise or sunset images
low ISO landscape photography
maximum sharpness
A tripod becomes especially valuable when using:
ND filters
slower shutter speeds
focus stacking techniques
For casual daytime photography, a handheld camera can work, but serious landscape images benefit from a stable setup.
What lens is best for Portland Head Light photography?
The best lens depends on the composition you want.
Wide-Angle Lens (14–35mm)
Best for:
dramatic coastal landscapes
including ocean and sky
emphasizing the environment around the lighthouse
Standard Zoom (24–70mm)
Best all-around choice because it allows you to:
capture wider scenes
isolate details
quickly adjust compositions
Telephoto Lens (70–200mm)
Useful for:
compressing the lighthouse against the coastline
isolating architectural details
creating layered coastal scenes
A versatile zoom lens is often more valuable than carrying multiple specialized lenses.
Is Portland Head Light crowded for photography?
Yes, Portland Head Light is one of Maine's most photographed locations, so crowds are common.
To avoid the busiest conditions:
arrive before sunrise
visit outside peak summer hours
photograph during colder months
explore less obvious viewpoints
Even during busy periods, the location offers enough space to create unique compositions.
The key is arriving with a plan rather than simply photographing the first viewpoint you see.
Can you fly a drone at Portland Head Light?
Drone photography at Portland Head Light requires careful planning.
Before flying, photographers should check:
current FAA regulations
park restrictions
weather conditions
nearby aircraft activity
Drone photography can create incredible perspectives, but responsible operation is essential around public parks, historic structures, and visitors.
Always verify current rules before launching.
Is Portland Head Light worth photographing in winter?
Absolutely.
Winter is one of the most underrated times to photograph Portland Head Light.
Benefits include:
fewer visitors
dramatic coastal weather
snow-covered landscapes
powerful ocean conditions
unique atmosphere
Winter storms and overcast skies can create some of the most dramatic lighthouse images.
The location changes significantly throughout the year, which is why returning during different seasons can produce completely different photographs.
What makes Portland Head Light a great photography location?
Portland Head Light combines several elements that make a strong landscape photograph:
historic architecture
rugged coastline
ocean movement
dramatic weather
changing seasonal conditions
Unlike many landmarks that rely on a single viewpoint, Portland Head Light offers endless opportunities through different:
compositions
weather conditions
times of day
seasons
That variety is what makes it one of the best lighthouse photography locations in New England.
==========
Photography by Chris Sidoruk, a Connecticut photographer specializing in coastal landscapes, concert photography, and visual storytelling throughout New England.
Shot using a DJI Mavic Air and Nikon D7000 with settings for landscape photography.
All images © Chris Sidoruk. No use, copying, or redistribution without license.
Explore More New England Photography Guides
Continue planning your Maine and New England photography adventures:
→ Photographing Nubble Lighthouse
→ New England Photography Guide: Best Places to Photograph
→ Best Cameras for Landscape Photography
→ Best Lenses for Landscape Photography
→ Best Tripods for Landscape Photography
