

Low Light Concert Photography Tips: How to Capture Sharp Live Music Photos
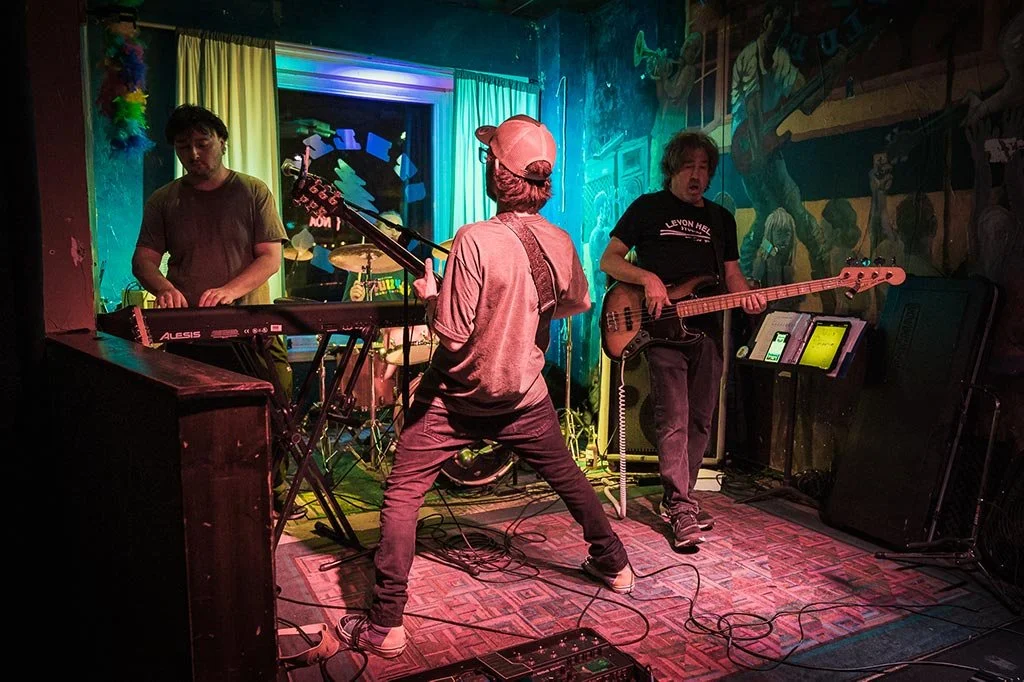
The Arctic Tortugas performing at Stella Blue's in New Haven, Connecticut. | ©2022 Chris Sidoruk
*Some links in this guide are affiliate links. If you purchase through them, it helps support my work at no extra cost to you.
Last updated: July 2026
Quick Jump
- Understanding Low Light Concert Photography
- Quick Low Light Concert Photography Settings
- Balancing Aperture, Shutter Speed & ISO
- Best Camera Settings for Low Light Concerts
- Autofocus Tips for Dark Concert Venues
- Choosing the Right Lens for Low Light
- Editing Low Light Concert Photos
- Frequently Asked Questions
Low light concert photography is one of the biggest challenges photographers face when shooting live music.
Unlike controlled studio environments, concerts rarely give you predictable conditions. Lighting changes constantly, performers move quickly, and many venues provide only small amounts of usable light.
You are often trying to balance:
fast-moving performers
dark backgrounds
colorful stage lighting
high ISO settings
limited shooting positions
The goal is not to eliminate the challenges of low light photography.
The goal is learning how to work with them.
With the right combination of camera settings, lenses, autofocus techniques, and shooting experience, you can consistently capture sharp, professional-looking concert images even in difficult lighting.
This guide focuses on real-world low light concert photography techniques used in clubs, theaters, festivals, and small venues.
For exact starting settings, see:
Understanding Low Light Concert Photography
Low light photography becomes difficult because your camera is receiving less available light while your subject is still moving.
That creates three major challenges:
Motion Blur
Musicians rarely stay still.
Between:
jumping
playing instruments
moving across the stage
changing expressions
you often need faster shutter speeds than the lighting allows.
A shutter speed that works for a static subject may create blurry images during a performance.
Digital Noise
Higher ISO settings allow you to capture more light, but they also introduce more noise.
The important thing to remember:
A sharp, slightly noisy concert photo is usually better than a clean but blurry image.
Modern cameras handle high ISO much better than older systems, making it possible to capture professional results in conditions that were previously extremely difficult.
Autofocus Challenges
Dark venues can make autofocus less reliable.
Your camera may struggle with:
low contrast subjects
rapidly changing lighting
performers moving through shadows
Understanding your autofocus system is just as important as understanding exposure.
Quick Low Light Concert Photography Settings
There is no single perfect concert photography setting, but these are strong starting points:
| Setting | Starting Point |
|---|---|
| Shooting Mode | Manual |
| Aperture | f/1.8–f/2.8 |
| Shutter Speed | 1/160–1/320 sec |
| ISO | 800–6400+ |
| Focus Mode | Continuous AF (AF-C / AI Servo) |
| File Format | RAW |
| White Balance | Auto or adjusted in post |
| Drive Mode | Continuous/Burst |
Shooting Mode
Starting Point: Manual
Aperture
Starting Point: f/1.8–f/2.8
Shutter Speed
Starting Point: 1/160–1/320 sec
ISO
Starting Point: 800–6400+
Focus Mode
Starting Point: Continuous AF (AF-C / AI Servo)
File Format
Starting Point: RAW
White Balance
Starting Point: Auto or adjusted in post
Drive Mode
Starting Point: Continuous/Burst
The exact settings will depend on:
venue lighting
camera body
lens aperture
performer movement
A small acoustic venue may require very different settings compared to a large festival stage.
Balancing Aperture, Shutter Speed, and ISO
Low light concert photography is really about managing the exposure triangle.
You are constantly balancing:
aperture
shutter speed
ISO
Changing one setting affects the others.
Aperture: Let More Light Into the Camera
A wide aperture is one of the biggest advantages you can have.
Common concert photography choices:
f/1.4
f/1.8
f/2
f/2.8
A wider aperture helps you:
capture more available light
maintain faster shutter speeds
separate performers from backgrounds
Fast lenses are often more valuable than simply having a higher-end camera body.
See:
→ Best Lenses for Concert Photography
Shutter Speed: Freeze the Performance
Shutter speed controls how much movement is captured.
Common starting points:
1/125 sec
Works for:
slower performers
acoustic sets
calmer moments
1/200–1/320 sec
Better for:
singers moving on stage
guitarists
energetic performances
1/500 sec+
Useful for:
jumping
fast movement
dramatic action shots
The challenge is that faster shutter speeds require more light.
ISO: Accept the Noise
Many photographers make the mistake of trying to keep ISO too low.
In concert photography, higher ISO is normal.
Modern cameras can produce excellent images at:
ISO 1600
ISO 3200
ISO 6400
even higher depending on the camera
The priority should be:
correct exposure
sharp subject
acceptable noise
Noise can be reduced during editing.
Motion blur cannot always be fixed.
Real-World Low Light Examples
Different venues require different approaches.
Small Club With Dark Lighting
Typical settings:
f/1.8
1/200 sec
ISO 3200–6400
Priorities:
fast lens
accurate autofocus
timing peak moments
Theater Performance
Typical settings:
f/2.8
1/250 sec
ISO 1600–3200
The lighting is usually more controlled, allowing slightly cleaner files.
Outdoor Night Festival
Typical settings:
f/2.8
1/320 sec
ISO 1600–6400
Challenges:
changing stage lights
distance from performers
mixed lighting colors
Acoustic Performance
Typical settings:
f/1.8–f/2.8
1/125–1/200 sec
ISO 800–3200
Because movement is often slower, you can prioritize image quality slightly more.
Why Technique Matters More Than Settings
Settings help, but they are only part of the equation.
The best low light concert photographers also understand:
when musicians move
where stage lights will hit
when expressions peak
how performers interact with the crowd
A perfectly exposed photo of a boring moment is still a weak image.
A slightly noisy photo capturing an unforgettable moment is often the one people remember.

Don DeStefano of Creamery Station at The Kent Stage in Kent, Ohio. | ©2022 Chris Sidoruk
Best Low Light Concert Camera Settings (Expanded)
While every venue is different, having a reliable starting point makes it much easier to adapt quickly.
The biggest mistake photographers make in difficult lighting is constantly changing settings without understanding what problem they are trying to solve.
Instead, think about what you need:
Is the performer blurry? Increase shutter speed.
Is the image too dark? Increase ISO or open the aperture.
Is autofocus missing? Change focus strategy.
Are highlights blown out? Adjust exposure.
Your settings should respond to the environment.
Shooting Mode: Manual Exposure
Manual mode is usually the best choice for concert photography.
Concert lighting changes constantly, and your camera's meter can be easily confused by:
bright spotlights
dark backgrounds
LED screens
colorful stage effects
Manual exposure gives you consistency throughout a performance.
A common workflow:
Set your aperture based on available light.
Choose a shutter speed based on performer movement.
Adjust ISO until exposure is correct.
Aperture Settings
A wide aperture is one of the most important tools for low light photography.
Common choices:
f/1.4–f/1.8
Best for:
extremely dark venues
small clubs
available-light portraits
separating performers from backgrounds
Advantages:
maximum light gathering
lower ISO requirements
stronger subject separation
Disadvantages:
thinner depth of field
more focus mistakes
f/2–f/2.8
Often the practical sweet spot.
Advantages:
still gathers plenty of light
easier focus accuracy
more of the performer stays sharp
Many professional concert photographers spend most of their time in this range.
Shutter Speed Settings
Shutter speed is often the difference between a usable image and motion blur.
Recommended starting points:
| Situation | Shutter Speed |
|---|---|
| Slow singer-songwriter performance | 1/125 sec |
| General concert shooting | 1/160–1/250 sec |
| Energetic performers | 1/320 sec |
| Fast movement/jumping | 1/500 sec+ |
Slow singer-songwriter performance
Shutter Speed: 1/125 sec
General concert shooting
Shutter Speed: 1/160–1/250 sec
Energetic performers
Shutter Speed: 1/320 sec
Fast movement/jumping
Shutter Speed: 1/500 sec+
Remember:
A sharp image with more noise is usually preferable to a blurry image with less noise.
ISO Settings
Don't be afraid of ISO.
Concert photography regularly requires higher ISO values.
Typical ranges:
Small dark venue:
ISO 3200–12800
Medium indoor venue:
ISO 1600–6400
Outdoor festival at night:
ISO 1600–6400
Modern full-frame cameras such as the:
handle high ISO extremely well compared with older generations.
Autofocus Strategies in Dark Venues
Autofocus is one of the biggest challenges in low light concert photography.
A camera that focuses perfectly in daylight can struggle when the stage becomes dark.
The key is understanding how to help your autofocus system.
Use Continuous Autofocus
For moving performers, use:
AF-C (Nikon)
AI Servo (Canon)
Continuous AF (Sony)
This allows the camera to continuously adjust focus as the performer moves.
Single autofocus modes can work for static moments but are less reliable during performances.
Use Subject Detection When Available
Modern cameras have improved dramatically.
Features like:
eye detection
face detection
subject tracking
can be extremely useful.
However, don't depend on them completely.
Concert lighting can confuse even advanced systems.
Choose the Right Autofocus Area
For concerts, smaller autofocus areas are often more reliable.
Useful options:
single-point AF
small zone AF
flexible spot AF
Large tracking areas may grab:
microphones
instruments
lighting equipment
background objects
instead of the performer.
When Autofocus Fails
Some situations are simply difficult:
very dark stages
backlit performers
smoke machines
rapidly changing lights
Solutions:
switch to a brighter focus point
wait for better light
pre-focus on a predictable position
use manual focus when necessary
Professional photographers miss focus too.
The difference is learning how to recover quickly.
Choosing the Right Lens for Low Light Concert Photography
Your lens choice often matters more than your camera body.
A fast lens gives you more options when lighting becomes difficult.
35mm Lens
Excellent for:
small venues
environmental portraits
documenting the whole stage
backstage photography
A 35mm lens lets you include the performer and the atmosphere around them.
50mm Lens
One of the most versatile concert photography choices.
Great for:
individual performers
natural perspective
portraits
smaller stages
A 50mm f/1.8 lens is often one of the best value upgrades photographers can make.
85mm Lens
Excellent for:
performer portraits
isolating subjects
shooting from farther away
The compression can create beautiful stage images.
70-200mm f/2.8 Lens
The professional workhorse.
Advantages:
reach
flexibility
fast aperture
ability to shoot from the crowd
Ideal for:
larger venues
festivals
theater performances
The downside:
heavier
more expensive
Shooting RAW vs JPG for Concert Photography
RAW is strongly recommended for concert photography.
Stage lighting creates some of the most difficult color conditions photographers encounter.
You may deal with:
red LED lighting
blue washes
green spotlights
mixed stage colors
rapidly changing exposure
RAW files give you much more flexibility.
Benefits:
better highlight recovery
easier white balance adjustments
more shadow detail
better noise reduction options
JPG can work when:
images need immediate delivery
storage is limited
lighting is consistent
For professional concert photography, RAW is usually the better choice.
See:
White Balance & Stage Lighting
Concert lighting can be extremely unpredictable.
A performer may move through:
warm orange light
cool blue light
purple LEDs
bright white spotlights
Trying to perfectly balance every color in-camera is often impossible.
Recommended Approach
Shoot RAW and adjust later.
Good starting options:
Auto White Balance
Advantages:
fast
adapts quickly
easy workflow
Fixed Temperature
Useful when:
lighting is consistent
you want a consistent gallery look
Don't Remove All Color
A common editing mistake is neutralizing concert lighting completely.
The colors are part of the experience.
A red stage isn't necessarily inaccurate—it represents what the audience actually saw.
The goal is realistic color, not removing the atmosphere.
Burst Shooting Strategy
Continuous shooting can help capture important moments, but it should be used intentionally.
Good times to use burst:
jumps
guitar solos
drum hits
emotional expressions
crowd interactions
Avoid holding the shutter constantly.
Reasons:
creates unnecessary files
slows workflow
makes culling harder
encourages relying on luck
The best photographers combine:
anticipation
timing
short bursts
The goal is not hundreds of similar images.
The goal is the one frame where everything comes together.
How Professional Concert Photographers Handle Difficult Lighting
Experienced photographers don't eliminate difficult lighting.
They adapt to it.
A professional approach usually involves:
Watching the Light
Stage lighting is often predictable.
Photographers learn:
when spotlights hit performers
where musicians stand
when colors change
when dramatic moments happen
Anticipating Movement
Instead of reacting after something happens, watch for clues.
Examples:
guitarist stepping forward
singer approaching the microphone
drummer preparing for a fill
performer interacting with the crowd
The best images often happen because the photographer was ready before the moment.
Accepting Imperfection
Concert photography is not studio photography.
Images can include:
grain
motion
dramatic shadows
unusual colors
Those elements often create the feeling of being there.
Venue-Specific Low Light Examples
Different venues require different approaches.
Small Clubs
Examples:
bars
intimate music rooms
small stages
Challenges:
limited lighting
close distances
dark backgrounds
Recommended:
35mm or 50mm lens
f/1.4–f/2
ISO 3200+
1/160–1/250 sec
Prioritize:
expressions
atmosphere
interaction
Theaters and Performing Arts Venues
Examples:
seated venues
controlled productions
stage performances
Advantages:
better lighting
predictable positions
Recommended:
70-200mm f/2.8
f/2.8
ISO 1600–3200
1/250 sec+
Focus on:
stage composition
performer relationships
lighting design
Music Festivals
Challenges:
changing weather
distance
massive stages
changing light
Recommended:
70-200mm f/2.8
100-400mm lens
f/2.8–f/5.6
ISO 1600–6400
Look for:
crowd interaction
dramatic lighting
wide environmental shots
Composition Techniques for Low Light Concert Photography
Low light concert photography is not only a technical challenge.
Even with perfect exposure and sharp focus, the image still needs to tell a story.
Strong composition becomes even more important in difficult lighting because you often have fewer visual elements to work with.
Instead of simply documenting the performer, look for:
emotion
movement
connection
atmosphere
interaction between light and subject
Use Stage Lighting as a Composition Tool
Concert lighting is not just something to overcome.
It is part of the photograph.
Look for:
beams of light creating leading lines
silhouettes against bright backgrounds
colored lighting separating performers from the scene
shadows that create depth
A performer standing in a single spotlight can often create a stronger image than a perfectly exposed frame with flat lighting.
Shoot Through the Environment
Avoid isolating every performer.
Sometimes the strongest images include:
microphone stands
instruments
stage equipment
audience members
venue architecture
These details help communicate the feeling of being at the show.
Capture Peak Moments
Low light photography rewards anticipation.
Look for moments such as:
a singer leaning into the microphone
a guitarist jumping
a drummer raising a stick before a hit
a crowd reaction
a performer looking toward another musician
The combination of timing and light creates memorable images.
Use Different Perspectives
Changing your position can completely change the photograph.
Try:
Low angles
Creates:
stronger stage presence
more dramatic compositions
larger-than-life feeling
Side angles
Shows:
performer interaction
stage depth
lighting effects
Wide environmental shots
Shows:
venue atmosphere
crowd energy
the scale of the performance
Don't Forget the Quiet Moments
Not every great concert photograph is an action shot.
Some of the strongest images happen during:
pauses between songs
conversations between musicians
moments of concentration
emotional reactions
Low light often creates a more intimate atmosphere, which can work beautifully for storytelling.
Editing Workflow for High ISO Concert Images
Editing is an important part of low light concert photography.
High ISO images often require more careful processing than daytime photographs.
The goal is not to make the image look noise-free.
The goal is to create a natural-looking photograph while preserving detail.
Step 1: Correct Exposure First
Before reducing noise, fix the overall exposure.
Adjust:
exposure
highlights
shadows
contrast
A noisy properly exposed image usually looks better than an underexposed image pushed aggressively in editing.
Step 2: Adjust White Balance
Concert lighting creates difficult color conditions.
Correct:
unwanted color casts
skin tones
extreme saturation
But avoid removing the character of the stage lighting.
Step 3: Apply Noise Reduction Carefully
Noise reduction should be subtle.
Too much:
removes skin texture
destroys hair detail
creates plastic-looking images
A small amount of grain often feels more natural.
Step 4: Sharpen Selectively
High ISO images can lose some detail.
Use sharpening carefully.
Focus on:
eyes
instruments
important details
Avoid sharpening backgrounds and noisy areas.
Step 5: Apply Consistent Editing Across the Gallery
When delivering concert images, consistency matters.
A gallery should feel cohesive.
Avoid having:
one image extremely warm
another extremely cool
inconsistent contrast levels
The goal is a unified visual story.
Noise Reduction Without Losing Detail
Noise is one of the biggest concerns with low light photography.
However, removing all noise is usually the wrong goal.
Some grain is normal.
The better question is:
"Does the noise distract from the photograph?"
Tips for Better Noise Reduction
Start with a good exposure
Proper exposure reduces the need for aggressive noise reduction.
Use modern AI noise reduction tools
Software has improved significantly.
Tools from:
Adobe Lightroom
Adobe Camera Raw
DxO PureRAW
Topaz Photo AI
can improve high ISO images while preserving much more detail than older noise reduction methods.
Reduce noise by area
A common approach:
Reduce noise in:
dark backgrounds
empty areas
shadows
Maintain detail in:
faces
instruments
clothing textures
Common Mistakes Photographers Make in Low Light Concerts
Many low light problems are caused by technique rather than equipment.
Using Too Slow of a Shutter Speed
This is the most common mistake.
A photographer sees a dark stage and slows the shutter too much.
The result:
blurry performers
missed expressions
soft images
Increase ISO before sacrificing shutter speed.
Underexposing and Trying to Fix It Later
A heavily underexposed ISO 6400 image pushed several stops in editing will usually look worse than a properly exposed ISO 12800 image.
Expose correctly in-camera.
Shooting Wide Open All the Time
A fast lens is useful, but f/1.4 is not always the best choice.
Extremely shallow depth of field can create:
missed focus
partially sharp faces
inconsistent results
Sometimes f/2 or f/2.8 produces a better image.
Ignoring Backgrounds
Even with a great subject, distracting backgrounds weaken the photograph.
Look for:
clean lighting
interesting shapes
separation between subject and background
Relying Too Much on Burst Mode
Spraying hundreds of images does not replace timing.
Learn to anticipate moments.
Changing Settings Constantly
Constant adjustment creates missed opportunities.
Develop reliable starting points and make small adjustments.
Building a Low Light Concert Photography Kit
A strong low light setup does not require the most expensive gear.
It requires the right priorities.
Camera Body
Important features:
strong high ISO performance
reliable autofocus
good RAW files
dual card slots for professional work
Examples:
Essential Lenses
35mm f/1.8
Best for:
small venues
environmental storytelling
backstage work
50mm f/1.8
Best value option.
Great for:
portraits
general concert coverage
smaller stages
85mm f/1.8
Best for:
performer portraits
isolating subjects
70-200mm f/2.8
The professional concert standard.
Best for:
theaters
festivals
larger stages
Accessories That Matter
Bring:
extra batteries
reliable memory cards
comfortable camera strap
backup storage
lens cloth
ear protection
Concert environments are unpredictable.
Preparation matters.
Final Recommendations
Low light concert photography is challenging because it combines nearly every difficult photography situation:
movement
unpredictable lighting
high ISO
limited control
The solution is not one magic setting.
It is understanding how to balance:
aperture
shutter speed
ISO
autofocus
timing
composition
The most important lessons:
Use fast lenses whenever possible.
Do not be afraid of high ISO.
Prioritize sharpness over perfectly clean files.
Learn how performers move.
Use lighting creatively.
Edit carefully without removing the atmosphere.
With experience, difficult lighting becomes an advantage.
Some of the most memorable concert photographs happen because the conditions were challenging.
Frequently Asked Questions
What is the best shutter speed for low light concert photography?
A good starting point is 1/160–1/250 second. Faster shutter speeds may be needed for energetic performers, while slower speeds can work for calmer performances.
What ISO should I use for concert photography?
Most concerts require ISO 1600–6400, but modern cameras can often handle higher settings. The correct ISO depends on the lighting, lens aperture, and desired shutter speed.
What lens is best for low light concert photography?
Fast prime lenses like 35mm f/1.8, 50mm f/1.8, and 85mm f/1.8 are excellent choices. A 70-200mm f/2.8 is one of the most versatile professional options for larger venues.
Why are my concert photos blurry?
The most common cause is a shutter speed that is too slow for performer movement. Increase ISO or use a wider aperture to maintain a faster shutter speed.
Should I use autofocus or manual focus for concerts?
Autofocus is usually preferred. Use continuous autofocus with appropriate focus tracking. Manual focus is useful when lighting is extremely difficult or predictable.
Is high ISO bad for concert photography?
No.
High ISO is a normal part of professional concert photography. A sharp high ISO image is usually much more valuable than a blurry low ISO image.
Should I shoot RAW for concert photography?
Yes.
RAW provides much more flexibility when correcting exposure, white balance, and difficult stage lighting.
Can you shoot concerts with a kit lens?
Yes, but it can be challenging.
Most kit lenses have smaller maximum apertures, making it harder to maintain fast shutter speeds in dark venues. A fast prime lens is often the first major upgrade worth considering.
==========
All photographs © Chris Sidoruk. Images are protected by copyright and may not be used, copied, modified, or redistributed without written permission.
Core Concert Photography Guides
→ Best Camera Settings for Concert Photography
→ Best Cameras for Concert Photography
→ Best Lenses for Concert Photography
→ Concert Photography Composition Guide
Supporting Workflow Articles
→ 3-2-1 Backup Strategy for Photographers
→ Best Memory Cards for Concert Photography
